How to create an ERC 20 token with OpenZeppelin
This post will walk you through the process of creating an ERC20 token with the OpenZeppelin Contracts Library.

This is lesson 3 of the Smart Contracts 101 free course by Rohas Nagpal.
There are 2 ways to build a Smart Contract:
Option 1: Start from scratch and code it yourself.
Option 2: Use the OpenZeppelin collection of secure & tested smart contracts as building blocks.
I strongly recommend option 2 - it minimizes risk by using "battle-tested libraries" of smart contracts for Ethereum and other blockchains.
This post will walk you through the process of creating an ERC20 token with the OpenZeppelin Contracts Wizard.
1. Let’s get started
Go to the OpenZeppelin Contracts Wizard and click on ERC20.
Here’s what your screen will look like:
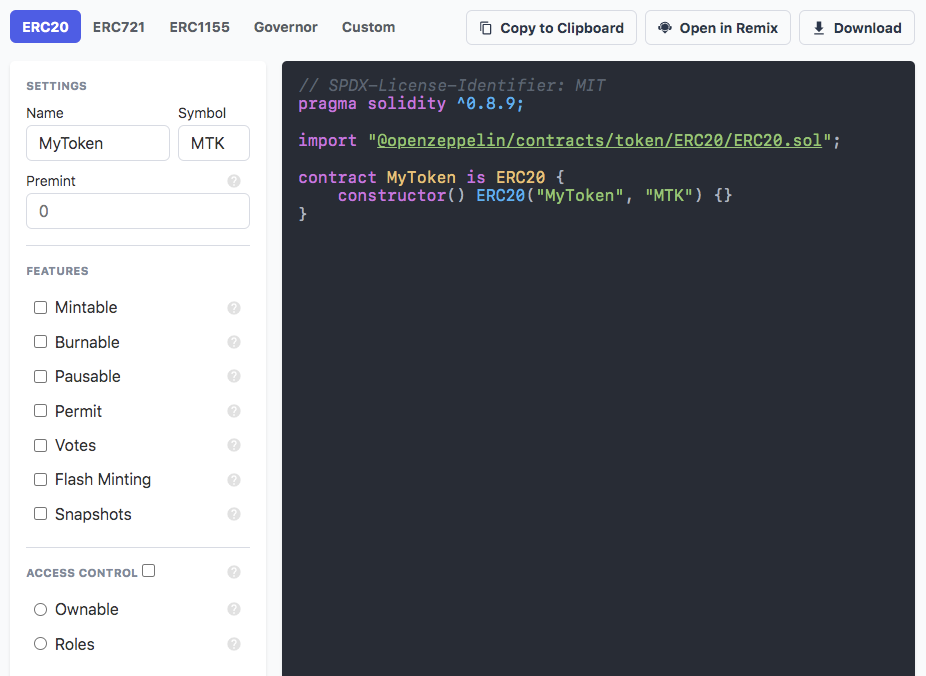
Enter the name & symbol e.g. Rohas Nagpal & ROHAS.
Let’s also add 10,000 in the Premint input box. This will create an initial amount of 10,000 tokens on deployment.
Here’s what your code will look like:

Here’s what it means:
// SPDX-License-Identifier: MITThis is a comment indicating that the smart contract is licensed under the MIT License, a permissive open-source license.
pragma solidity ^0.8.9;This line specifies the version of the Solidity compiler required to compile the smart contract. In this case, it requires a version compatible with 0.8.9.
import "@openzeppelin/contracts/token/ERC20/ERC20.sol";This line imports the ERC20 contract from the OpenZeppelin library.
contract RohasNagpal is ERC20 {This line defines a new smart contract called "RohasNagpal" that inherits from the ERC20 contract imported from OpenZeppelin. By inheriting the ERC20 contract, RohasNagpal will have all the standard functionality of an ERC20 token.
constructor() ERC20("Rohas Nagpal", "ROHAS") {This is the constructor of the RohasNagpal contract. It will be called only once when the contract is deployed. The constructor calls the constructor of the ERC20 contract with two parameters: the name of the token ("Rohas Nagpal") and the symbol of the token ("ROHAS").
When deployed, this smart contract will create a new ERC20 token named "Rohas Nagpal" with the symbol "ROHAS", utilizing the well-tested and secure OpenZeppelin ERC20 contract as its foundation.
2. Let’s add some features
Now you can tick/check the various options under the FEATURES section. As you check an option, you will notice that some code gets added.
Here’s what each option means:
Mintable
Mintable: Privileged accounts will be able to create more supply.

function mint(address to, uint256 amount) publicThis defines a new function named mint with public visibility, meaning it can be called by any address, including the contract itself. The function takes two arguments:
address to, which is the address that will receive the minted tokens, and
uint256 amount, which is the number of tokens to be minted.
onlyOwnerThis is a modifier provided by the OpenZeppelin library's Ownable contract. It restricts the mint function so that it can only be called by the owner of the contract.
_mint(to, amount)This calls the internal _mint function, which is provided by the ERC20 contract from OpenZeppelin. It creates new tokens and adds them to the balance of the specified address.
With the mint function, the contract owner can create new tokens and distribute them as needed. This can be useful for:
distributing tokens during an initial coin offering (ICO),
rewarding users for specific actions, or
creating new tokens for a platform's ecosystem.
Burnable
Burnable: Token holders will be able to destroy their tokens.

is ERC20BurnableThe is keyword is used again to inherit from the ERC20Burnable contract. The ERC20Burnable contract extends the functionality of the ERC20 contract by adding a burn feature. This feature allows token holders to destroy (burn) their tokens, permanently removing them from circulation.
Pausable
Pausable: Privileged accounts will be able to pause the functionality marked as whenNotPaused. Useful for emergency response.
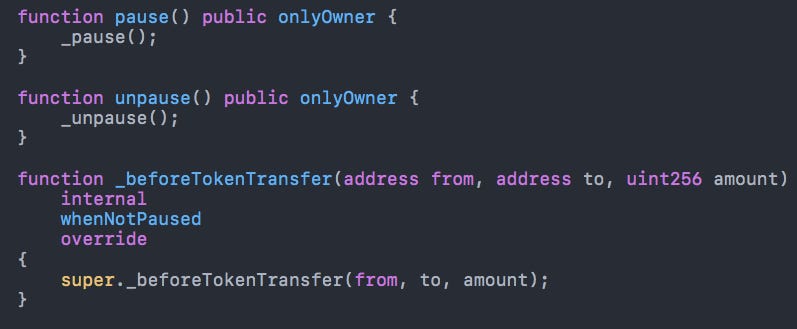
This defines two public functions:
pause
unpause
These can only be called by the contract owner to pause & unpause the token contract, respectively.
Additionally, it overrides the internal _beforeTokenTransfer function to ensure transfers are only allowed when the contract is not paused.
Permit
Permit: Without paying gas, token holders will be able to allow third parties to transfer from their accounts.
ERC20Permit("Rohas Nagpal") This is a constructor call for the ERC20Permit contract, which is an extension of the ERC20 contract from the OpenZeppelin library.
The ERC20Permit contract adds support for the EIP-2612 permit function, which allows users to approve token allowances with a signature rather than requiring an on-chain transaction.
Votes
Votes: Keeps track of historical balances for voting in on-chain governance, with a way to delegate one's voting power to a trusted account.
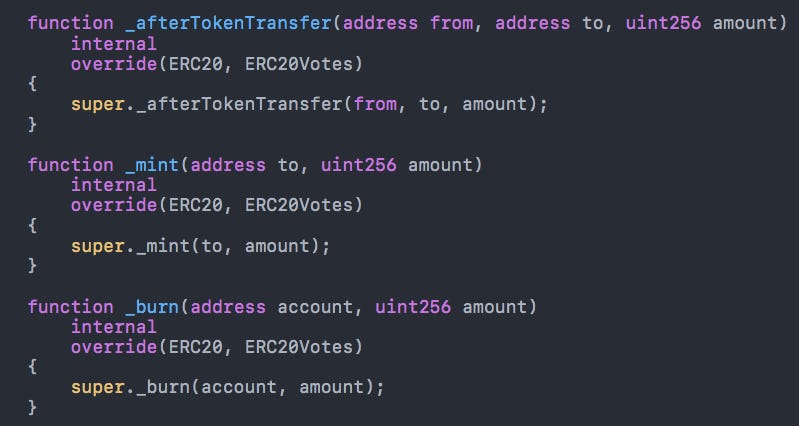
This overrides 3 internal functions:
_afterTokenTransfer
_mint
_burn
The custom token contract inherits from ERC20 and ERC20Votes contracts from the OpenZeppelin library. The ERC20Votes contract is an extension of the ERC20 contract that adds support for token-based voting using the EIP-712 standard.
Flash Minting
Flash Minting: Built-in flash loans. Lend tokens without requiring collateral as long as they're returned in the same transaction.
contract RohasNagpal is ERC20, ERC20FlashMintThis adds support for flash minting.
Flash minting allows anyone to mint an arbitrary amount of tokens, provided that they return the same amount of tokens to the contract by the end of the transaction. This can be useful for arbitrage opportunities, liquidations & collateral swaps.
Snapshots
Snapshots: Privileged accounts will be able to store snapshots of balances that can be retrieved later. Note: For on-chain voting, the Votes option is preferable.

This adds support for creating snapshots of token balances at specific points in time.
3. Let’s set the access control
Now you can tick/check the various options under the ACCESS CONTROL section. These options restrict who can access the functions of a contract or when they can do it.
Here’s what each option means:
Ownable: Simple mechanism with a single account authorized for all privileged actions.
Roles: Flexible mechanism with a separate role for each privileged action. A role can have many authorized accounts.
4. Let’s add upgradeability
Now you can tick/check the various options under the UPGRADEABILITY section. Smart contracts are immutable by default unless deployed behind an upgradeable proxy.
Here’s what each option means:
Transparent: Uses a more complex proxy with higher overhead, and requires fewer changes in your contract. Can also be used with beacons.
UUPS: Uses simpler proxy with less overhead, and requires including extra code in your contract. Allows flexibility for authorizing upgrades.
5. Let’s add a security contact
Enter the email address where people can contact you to report security issues.
6. Download your smart contract code
You can download the code by clicking on the Download button in the top right corner of the wizard.
7. Compile the smart contract
Now that the code for the smart contract has been written, it needs to be compiled into bytecode that can be executed by the Ethereum Virtual Machine (EVM).
This is typically done using an Integrated Development Environment (IDE) like Remix. An IDE is a software application that provides tools for writing, testing, and debugging code.
Now click on the Open in Remix button on the top right corner of the wizard.
Note: Make sure to use the same version of a compiler that is mentioned in your code.

Click on Compile contract.
After a few seconds, you will see a green tick in the right column:

8. Deploy the smart contract
Once the smart contract has been written & compiled, it can be deployed to the blockchain (e.g. Ethereum). This involves sending a transaction to the blockchain network that contains the bytecode for the smart contract.
Click on the Ethereum logo below the green tick.
A screen like this will show up.
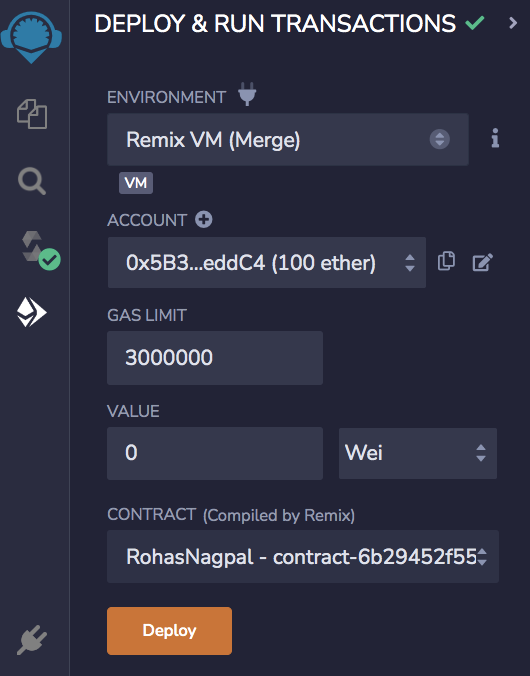
Select the environment / test network.

Your Metamask wallet will open up. Select your account address, and then click on Deploy.